How To Create Your Own Instagram Or Pinterest Collage Using PicMonkey

Introduction
There are a variety of ways to put your Instagram or Pinterest photos in your sidebar. To jazz things up a bit, this tutorial will show you how to create a photo collage image to link to your Instagram or Pinterest account. This is useful especially if you want your image a little more eye catching and not something that looks like what everyone else is doing. And why not? Your site is unique.
Now you may be thinking, "Oh no…does this require working in Photoshop? That’s too complicated!"
No, you don’t need to use Photoshop, Paint Shop Pro, or Gimp. Yes, those are very complicated software tools and very powerful for advanced photography adjustments or designs created from scratch (e.g., realistic water, replicating a photo portrait digitally drawn, 3D textures and effects, etc.). For most users, you don’t need to use Photoshop for your blog.
There are easier and simpler alternatives. In this tutorial, I chose to use PicMonkey after spending some time with it, it’s quite simple and a friendly interface—and this is coming from a long time Photoshop user.
Are you ready to create your own images? Let’s get started!
Table of Contents
This tutorial with screenshots is a bit long. You may already be familiar with PicMonkey in which you can just skip to the part that interests you.
Step 1: Gather Your Photos
Step 2: Choosing A Photo Collage Layout
Step 3: Upload Your Images
Step 4: Resize Your Images
Step 5: Adjust Your Background and Layout
Step 6: Save Your Image
Step 7: Adding Text
Step 8: Adjusting Your Collage For Text At The Bottom
Step 9: Changing The Background Color
Step 10: Adding Text On Top Of A Solid Color
Step 11: A Transparent Box With Text On Top
Step 12: Resizing Your Final Image To A Smaller Size
Step 1: Gather Your Photos
Gather Your Photos And Organize Your Work
To make your workflow easier, copy those images on your computer, to a different folder. For example, my folder and subfolders are:
\BasicPhotoEditingTips1-CreateInstagramPinterestCollage\
\BasicPhotoEditingTips1-CreateInstagramPinterestCollage\assets
\BasicPhotoEditingTips1-CreateInstagramPinterestCollage\images
The \assets folder is where I put source files I will be working with. In this case, it will be the photos I will be using to create the collage.
The \images folder is where I will save my work with PicMonkey and these can be variations of the layout.
Sometimes, when you’re working visually, you become undecided, so that folder will house all those versions which will have subfolders named version## as needed with notes if applicable. e.g. \images\version1, \images\version2, \images\version3
If I need to create a note, then for the \images\version1 folder, I would create a text file named notes.txt and will contain notes such as:
Version 1 of collage

* Background color applied - color: ff9b77.
* 6 photo layout with effects applied:
  - Cross Process - Red - 20% applied - painted in.
  - Dusk - 20%
You can be as detailed as you want. Anything that will help you remember certain settings if you take a break or need to come back to it a day or two later. It’s also useful if you like the result and want to re-create it for something else, you will know which effects you applied and it will help to keep you sane.
Gather Your Instagram or Pinterest Photos
For Instagram, the photos will be on your phone. And there are many ways to get it on your computer. You can email it to yourself or do your file transfer sync.
For Pinterest, sometimes you may not always have the photo on hand because you pinned it from another site. Here’s what you do:
- Go to your Pinterest account and click on the pin you want to include in your collage.
- Right click on the image and choose “Save Image As…”

Figure 1: Saving An Image From Pinterest To Your Computer
Step 2: Choosing A Photo Collage Layout
First, let’s start off with six images. These images could be anything you want. If you’re creating this for your Instagram account, you might want to choose photos that you have uploaded. If you’re a food blogger, photographer, painter, or sculpture artist, you might want to choose your best ones that can be found in your Instagram account.
Now head over to PicMonkey.
- Once you’re on PicMonkey’s site, click “Create a Collage”.

Figure 2: Click “Create a Collage” On PicMonkey’s Site
- Click the “Layout” icon. Choose “Biggie Smalls” and choose the third layout icon.

Figure 3: Choosing A Collage Layout
Step 3: Upload Your Images
Now let’s upload our photos to PicMonkey. Click the icon above “Layouts” and click the “Open photos” button to the right. Then click the “Open from my computer button” and navigate to where your photos are located. Choose six photos to upload, which will look like Figure 6.
Click the images below to view a larger version.

Figure 4: Open Photos

Figure 5: Choosing Images To Upload

Figure 6: Photos Loaded
Step 4: Resize Your Images
Once you dragged your photos in the collage, you can edit and resize each picture by hovering your cursor over the image and clicking the “Edit” button in the left corner. If you don’t see it for the smaller pictures on the left, then zoom in by using the keyboard shortcut Ctrl (Cmd) and the + sign. To zoom out, You would press Ctrl (Cmd) and the – sign.
You have a few edit options. You can scale the image, adjust the exposure, rotate left or right, flip horizontal and flip vertical. If you bring your cursor over the image, you can click and drag on the image to reposition it.
You’ll notice the tab “Effects” with a crown on it. That’s additional features for Royale members.

Figure 7: Adjusting Images
Step 5: Adjust Your Background and Layout
Click on the “Background” icon and you will see options for spacing, corner rounding and background color. I exaggerated the numbers as you can see in the screenshot below to show what each one does. There’s a checkbox for “Transparent background”. We will leave that unchecked for now.

Figure 8: Background Options
Make these your settings for the background as you see in the screenshot. Everything will be zero.

Figure 9: Background Settings
Step 6: Save Your Image
Before we go on to add text in the next step. Feel free to save your image now if you like. Right above your collage, click the “Save” button. Click “Sean” for a high quality image.
It’s always best to save a high quality image to your computer first. It gives you the flexibility to scale down the image as needed for other purposes such as a smaller size for your sidebar and a different size for your Facebook cover photo.
Step 7: Adding Text
Now we’re going to add some text. Before we start, open a new browser tab and go to PicMonkey again. Do not close your first browser tab to PicMonkey. Once you switch to the editor there is no way to change your layout.
In our second browser tab, click “Edit a photo”. Navigate to where you saved your high quality collage photo from Step 6 and upload it.
Now let’s begin adding our text. Click the “Text” icon which is the fourth icon down on the left and in the panel you have a variety of fonts to choose from. Click the “Add Text” so a text field is added to your image as you see in the screenshot below.
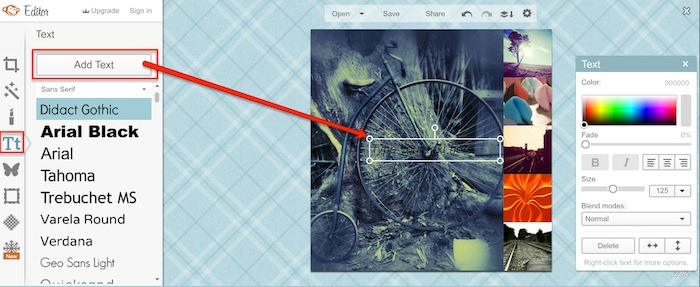
Figure 10: Adding Text
Double click the text field and type our text. For the image in this tutorial, I will make the text color white so I can see it. You select a color that works for your image. Maybe it might be black or another color that matches your collage.
And I will also change the font. Go through and choose a font that best matches the look you want to achieve.
Now we should have something like this:

Figure 11: Text Handles.
The red arrow points to handles that you click and drag to make it wider. The blue arrow, you can click and drag to rotate.
Now we’re getting closer, but I don’t like how this looks. I would like “Follow Me On Instagram!” to be on a single line and centered.
When you reposition your text and adjust your font size, it should look something like this:

Figure 12: Centering Text
If you are happy with your results at this point, save your file and head over to Step 12: Resizing Your Final Image To A Smaller Size.
If you’re not happy and want to try something else, keep reading.
If you find the photos you’re using and the text seems too hard to read or distracting and you want to move the text to the bottom of the image against a solid color background, that can certainly be done.
Step 8: Adjusting Your Collage For Text At The Bottom
In our first browser tab, go back to your photos. Select any image and drag it to your collage. Delete the image you just dragged in. Adjust the container so it’s a smaller box at the bottom.
Step 9: Changing The Background Color
Now that we made a small area at the bottom to place text, it’s a color we don’t want. Since I’m going to put this on Instagram, I’m thinking maybe an Instagram blue color would be nice. Let’s search Google and find out what is the hex color of Instagram’s blue.
According to Encycolorpedia, Instagram’s hex color is #3f729b and that’s the color we are going to plug into PicMonkey. For Pinterest’s red color it’s #c8232c. We are going to select the hex code and copy the text.
In PicMonkey, click the background icon. In the background panel, I see the pale light blue color box and the hex code #84e1ff. I’m going to click on the hex code and paste Instagram’s blue hex code then press enter. You should see the color change.
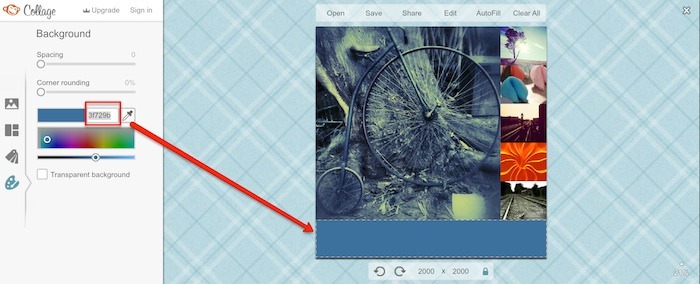
Figure 13: Editing The Collage Layout And Adding A Background Color
Step 10: Adding Text On Top Of A Solid Color
Save your image and go to your second browser tab. Follow Step: 7.
Step 11: A Transparent Box With Text On Top
In your second browser tab, click open and load in the first image you saved from Step 6. Click on “Overlays”, it’s the butterfly icon and click on “Geometric”. A Panel will slide down, choose the rectangle to add it to your image.

Figure 14: Adding A Rectangle

Figure 15: Putting A Rectangle On Our Collage
For this tutorial, we are going to place the rectangle in the top left, but leave a bit of space at the top. Then we are going to place our text on top of that rectangle. You should have something that looks like this:

Figure 16: Repositioning Our Rectangle And Text
We’re now going to make the rectangle transparent. Click on the rectangle and in the Overlay panel, change fade to 50%. The blending mode are different effects. You can go through them and see how they look. For this tutorial, we will keep the blend mode as “Normal”.

Figure 17: Adjusting The Fade Of Our Rectangle
It’s definitely looking better, but the text looks off balance. I want the word “Instagram” to be approximately the same width as the line above it. To do that, click on the text box, highlight the word “Instagram” and increase the font size.

Figure 18: Adjusting Font Size Of A Word In Our Text
Step 12: Resizing Your Final Image To A Smaller Size
Before you upload your image to your site, you need to resize your image so it’s smaller and not a huge file.
Click “Design” and choose “Custom”.
Figure 19: Creating A Custom Size To Resize Your Final Image
Then enter the dimensions 250 x 250. This is usually a good size for the sidebar. It can vary though. Some themes are different, so you will need to find the information about your theme, look for the width of the sidebar and resize your image to fit it.

Figure 20: Entering A Custom Size
Now you will need to import your photo to resize it. Click on “Overlays”, then click on “Your Own” and load your image. As you see in the screenshot below, it brings it in at a small size. Reposition and scale the image.

Figure 21: Importing Your Final Image You Want To Resize
When you’re done resizing your image, it should look like the screenshot below. Save your file and give it a distinct name so you know it’s a smaller size.
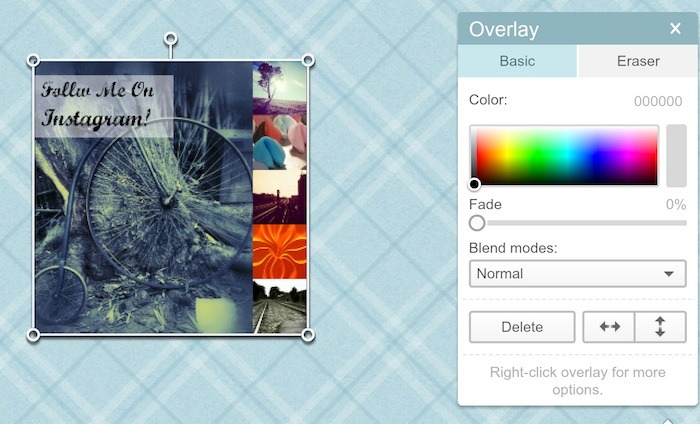
Figure 22: Final Image Resized To 250×250
If you compare the file size, you’ll notice that the resized image is much smaller compared to the original photo. So you can see and compare the difference, I will put the file sizes for my photo used in this tutorial.
Original photo:
Dimensions: 2000 x 2000
File Size: 1.8mb
Resized photo:
Dimensions: 250 x 250
File Size: 75kb
A huge difference! It’s very important to always scale down your high quality images for your site. It helps to make your site load quicker and it won’t use up your site’s storage space so quickly.
Conclusion
I hope this tutorial helped you out and has given you some great ideas to create your own image in your sidebar. Remember when you create your image widget, make sure it links back to your account.
Originally published on my WordPress.com site.
Tech and product enthusiast. Implementer. Always learning something new.
