How To Create A Gradient In PicMonkey
PicMonkey is a simple photo editing tool that’s easy to learn and use. While tinkering with PicMonkey, I did notice some limitations and tools that didn’t exist such as the gradient fill often found in Photoshop, Paint Shop Pro and others. It doesn’t mean it can’t be created in PicMonkey, it’s just a different way to create the same visual effect.
Simply follow the steps below to create the gradient.
Step 1: Create A Custom Design Size
At PicMonkey’s website. Click on “Custom Design” and enter 600 x 400 for the dimensions.
Step 2: Setting Up A Rectangle
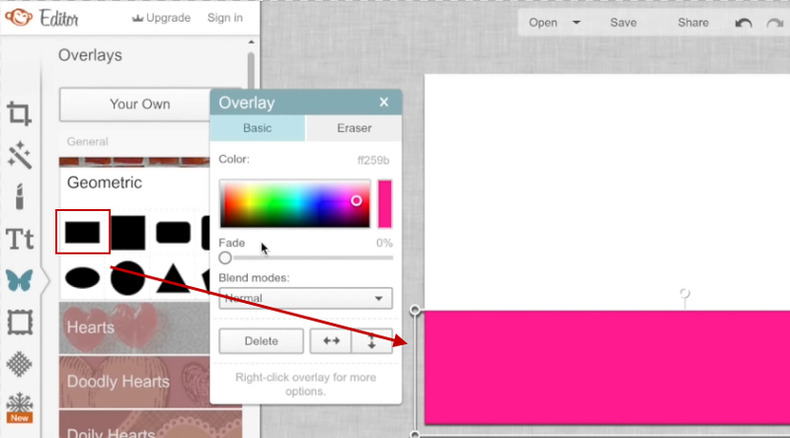
Once you created your custom design size, click on Overlays > Geometric > Rectangle. Size the rectangle to about 1/3 of the canvas and set the color to #FF259B.

Figure 1: Setting up a rectangular overlay for our gradient.
Step 3: Erasing Part Of The Rectangle
Click on the “Eraser” tab and choose a very large brush size and hardness set to 0. In this example, I chose a brush size of 82. Now start erasing the top part of the rectangle. Hold down the shift key to keep it straight.
As you can see, what we erased now has a soft, feathered look.

Figure 2: Erase part of the rectangle to create a feathered look.
Step 4: Resize The Rectangle
Now click on the “Basic” tab so the handles show up on the rectangle again. Click and drag it to fill up the entire size of the canvas. Size and position it to your liking.

Figure 3: Size and position our gradient as desired.
In the next tutorial, I will show you how to push the limits of PicMonkey even more and How To Create A Ray Of Light Effect.
Tech and product enthusiast. Implementer. Always learning something new.

